Migrating or moving the license from one system to another
Moving to a new computer? For every Gearmage program, the basic recipe is the same: fully uninstall the program on the old system, then install it and re-activate your license on the new one. A few products have extra steps to carry your settings across — find yours below.
| Why uninstall first? Each license covers a set number of installations. Once the program is running on the new system, make sure it's fully uninstalled from the old one. |
| Mail Attachment Downloader PRO Client or Server — copy your settings folder | Gear Doc Converter Uninstall, reinstall, optionally copy settings |
Mail Attachment Downloader PRO Client or PRO Server
Recommended: copy your settings folder
This is the simplest way. You don't need to update or otherwise touch the old system, and it works whichever version you're coming from. The new version migrates your settings the first time it starts.
Part 1 — On the old system
1 | PRO Server only: uninstall the service using the program's Service tab.
| |
2 | Quit the program. Then zip up everything in the %AppData%\MAD folder (open it in Explorer) into a zip file. Keep the zip somewhere you can reach from the new system. | |
3 | Fully uninstall the program from the Windows Control Panel. |
Part 2 — On the new system
4 | Install the latest version and build of the program — see instructions here. Use the download links that came with your license email. | |
5 | Re-activate and validate the same license on the new system. | |
6 | Quit the program. | |
7 | Unzip the contents of the zip from step 2 into the same %AppData%\MAD folder on the new system. | |
8 | Start the program. This should trigger the settings migration. | |
9 | Re-authenticate each of your mail accounts, then run a manual Connect and Download to test that everything works.
| |
10 | PRO Server only: install the service again from the Service tab. |
Alternative: export and import your settings
Prefer to use the program's own Export/Import tab? This works too, but you'll need to update the old system first so both systems are on the same version and build.
Part 1 — On the old system
1 | PRO Server only: uninstall the service using the program's Service tab.
| ||
2 | RECOMMENDED Update the old system to the latest build so both systems use the same version number and build — see instructions here. Then confirm everything works by running a manual Connect and Download.
| ||
3 | Export your settings to a .mdz file using the Export/Import tab. Keep this file somewhere you can reach from the new system. 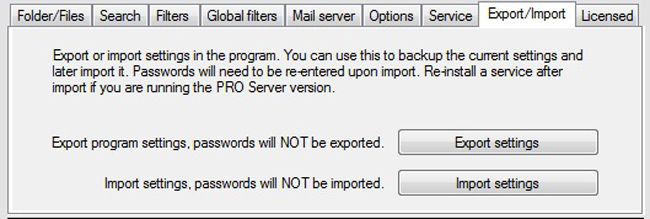 On the old system, click Export settings. | ||
4 | Fully uninstall the program from the Windows Control Panel. |
Part 2 — On the new system
5 | Install the latest version and build of the program — see instructions here. Use the download links that came with your license email. | ||
6 | Re-activate and validate the same license on the new system. | ||
7 | Import your settings from the .mdz file you exported earlier. On the new system, open the same tab and click Import settings.
| ||
8 | Quit the program and restart it. Then re-authenticate each of your mail accounts and run a manual Connect and Download to test that everything works. |
Backing up settings
Detailed instructions are available here.
|
|
Gear Doc Converter
Simply uninstall from the old system and re-install on the new system.
| Manual settings copy (optional) All settings are stored in %AppData%\GearDoc. Copy the contents of this folder to the new system and restart the program. |